Wednesday, February 17, 2016

Shooting with Natural Light - Indoors


So I’ve talked about shooting outside with full sun, even shade, dappled shade, sunrise/sunset, and cloudy days. What about when you want to shoot indoors with natural light? Easy! Just look for the best light. Anyone notice a pattern here? Look for the best light.

Indoors, the best natural light will be when you have your subject facing a window (the main light.) You should know that depending on the time of day, the light may be harsh. If so, just move the subject further away from the window (like 3 or 5 feet) until you get that soft light you’re looking for. If there isn’t much sun left and it’s late afternoon (or very early morning) you may have to move the subject closer to the window (like 1-2 feet.)

Just like all the other types of natural light, you want to move around your subject and shoot from different angles.  After a while you’ll find different angles produce better light than others.


Here’s an example of a dimly lit room or indirect window light. This room actually had a ton of windows so I had to draw the curtains to demonstrate. Anyway, this kind of light can be found all over your home where you have some light from one or two windows.

This kind of indoor light is okay, but it’s not amazing light. Also, darker color walls and floors tend to absorb light and make a room appear more dark. That being said, if you have a lot of white or light color walls, the light will be reflected and you can get a ton of light in a room that has only 1 or 2 windows.


Instead of shooting in a dimly lit room, try looking for places where bright window light fills the room, and place your subject in that light. Remember to move around the subject and try different angles.


Here’s a self portrait of me sitting in the dining room (in the light pictured above.) Yes, there was a couch in my dining room. Look at that nice, even light.


I can’t say this enough…. remember that not all good light is great light. In this example above, Ava was sitting on our bed, and we had several windows in the room. The image on the left is nice, but I moved slightly to the right for a different angle. The light looks much better in the photo on the right. See what I mean? I changed the angle just a few inches. That move made a big difference in the quality of light for this picture.


You can also use reflectors to add even more light to your subject when shooting indoors. You’ll want to do this especially when there isn’t much light and you need a little more light to light up the eyes or fill in dark details of the subject. This usually is the case when not much light is coming in a window. You can use inexpensive white poster board or foam core, wear a white shirt, even use natural reflectors like white or light colored walls. You can also buy small portable folding reflectors (they come in gold/silver.)

When using reflectors you’ll always want to position it so that the light bounces back the main light. In the example above, the window to the left is the main light and the reflector is bouncing that light back to Ava’s left side of her body. Since she wasn’t directly facing the window, I wanted to “fill in” the left side of her face with more light. This was not the only window in this part of the house – the right side of the couch had a couple of windows about ten feet away. So you don’t always have to have the subject face the main window, if you have enough natural light coming in from different directions.


Can you see that little bit of warm glow on Ava’s ear in the right of the photo? That’s that warm golden tone coming from the light bouncing back from that gold reflector. Now we have beautiful, even natural light in an indoor setting!

I’ve said it before and I’ll say it again – look at your subject from different angles. Look for the best light. It doesn’t matter if you’re shooting in full sun, dappled shade, even shade, sunrise/sunset, cloudy or inside with window light. You must do this in each situation and at each new location. Try shooting different angles until you get that light that makes your subject glow.

Wednesday, February 10, 2016

Shooting with Natural Light - Cloudy Days

Soft, naturally diffused light is what you get on cloudy, overcast days. And while you can't shoot sunflare or get that dreamy glow of backlight - there's all kinds of gorgeous light to work with. Shooting with natural light is often easier to do on cloudy days - lots of photographers get excited about dreary days because it means you can run around and take pictures wherever you want. Shooting in the middle of the day in an open field? Yep, totally can do that.

Perfect light no matter what?


Wrong.


Just because the clouds act as a giant diffuser, and you have this great light, does not mean all cloudy light is perfect. You still have to look for the best light. So what's my best tip to find the best quality natural light? Shoot from different angles until you find the sweet spot. You can also hold your hand up in front of you, and look at your palm. Turn around, watching your palm, and don't stop until you see your palm light up or have this glowing quality to it. When you see it, you'll be looking at really nice light. That's the place to put your subject. These two techniques are easy ways to find the best light.


In this example, I stood at the same spot. B took pictures of me from four different angles. As you can see, one angle is the best light. This is the light you’ll want to always look for. You can use the palm trick that I mentioned above, or you can just try a few quick shots of your subject from different angles until you find the best light. Even the slightest change in direction can take you from pretty light to fantastic light. If you’re shooting someone’s portraits, just tell them that you are taking a few practice shots to find the best light. Then let them know when you’re ready to rock and roll.

This activity of finding the best light before setting up a shot is key. You must do this with every new location, if you change position at the same location, or if the light suddenly changes. 


Here are some examples of images taken on cloudy days. Remember, just because it’s cloudy does not mean you can shoot wherever you feel like it. You must always look for the best natural light – no matter what the light conditions are.


In this photo the couple is facing the sun. Anytime you’re shooting on a cloudy day and it’s getting close to sunset, you’ll find that the available light you have to shoot with dwindles very fast. That’s because the sun is already on its way down so it’s a weak light, and to top it off it’s being diffused by clouds. So keep this in mind when you decide to start shooting on a cloudy day, close to sunset.


Because cloudy days have a natural diffuser, you can get gorgeous shots anytime of day. See all the details and colors in Bella’s fur? The concrete in the alley acts as a natural reflector and bounces more light back up. This photo was taken mid-day, but since it was a cloudy day we had a lots of opportunities to shoot in a wide variety of areas, areas that we normally would not be able to shoot in during typical mid-day full sun.

So that’s it for shooting with natural light on cloudy days! It’s really a fun time to take pictures - you have a lot more freedom when it comes to locations, but remember to always look for the best light.

Wednesday, February 3, 2016

Shooting with Natural Light - Sunrise and Sunset


The prettiest, most flattering and soft light happens when the sun is closest to the horizon at sunrise or sunset. When shooting portraits, I liked to start shooting the last 2 hours before sunset. For the first hour the sun would be too harsh to face directly. During that hour I searched out even light, dappled shade, or used backlighting. Once the sun touched the horizon, we'd hit the magic hour or the golden hour which lasts about 30-45 minutes (or less) depending on weather conditions. This is the best time to shoot portraits in a natural setting using only natural light.


1. What to do if the sun is too harsh If you find that the sun is too bright to face directly, you have 3 choices when shooting with natural light: find even light, dappled shade, or use backlight. Backlight is an excellent choice when you want to shoot in nature but the sun is too harsh at the time. Backlight will only work if the sun is low enough in the sky to be behind the subject. To capture soft backlight, expose for the subject. To capture a silhouette, expose for the background, then focus on the subject. These techniques can only be achieved if you are shooting in manual.


Examples of backlight, where the sun is behind the subject, and you expose for the subject.


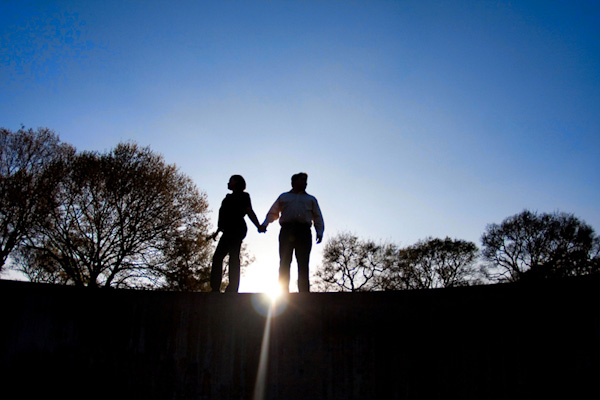
Examples of silhouettes, where the sun is behind the subject, and you expose for the background. Hint: take the meter reading off the sky.


2. The Magic Hour - AKA Sunrise and Sunset When you're shooting at sunrise or sunset, the magic hour is that brief window of time where the light is perfect everywhere you look. It's like the entire scene is one giant diffuser that makes every little detail shine. You'll notice different hues of color in water, the many shades of blades of grass, etc. This is simply magical light.

The only caveat is this light passes very quickly. It should also be noted that cameras with higher ISO capability and fast glass (lenses with wide open apertures) are pretty much necessary to shoot with natural light during this time without a tripod. Yes, it's a soft magic light but it's also a very weak light. The following three images are all examples of that moment when we had just enough light to face the sun, and you can see how perfect and even the light is in a natural setting.


The best quality natural light makes a huge difference with your photography. If you'd like to shoot portraits, try shooting during the magic hour. If you start shooting sooner than that - remember to seek out even light, dappled shade and use backlighting techniques until the sun reaches that magic hour.