Wednesday, February 17, 2016

Shooting with Natural Light - Indoors


So I’ve talked about shooting outside with full sun, even shade, dappled shade, sunrise/sunset, and cloudy days. What about when you want to shoot indoors with natural light? Easy! Just look for the best light. Anyone notice a pattern here? Look for the best light.

Indoors, the best natural light will be when you have your subject facing a window (the main light.) You should know that depending on the time of day, the light may be harsh. If so, just move the subject further away from the window (like 3 or 5 feet) until you get that soft light you’re looking for. If there isn’t much sun left and it’s late afternoon (or very early morning) you may have to move the subject closer to the window (like 1-2 feet.)

Just like all the other types of natural light, you want to move around your subject and shoot from different angles.  After a while you’ll find different angles produce better light than others.


Here’s an example of a dimly lit room or indirect window light. This room actually had a ton of windows so I had to draw the curtains to demonstrate. Anyway, this kind of light can be found all over your home where you have some light from one or two windows.

This kind of indoor light is okay, but it’s not amazing light. Also, darker color walls and floors tend to absorb light and make a room appear more dark. That being said, if you have a lot of white or light color walls, the light will be reflected and you can get a ton of light in a room that has only 1 or 2 windows.


Instead of shooting in a dimly lit room, try looking for places where bright window light fills the room, and place your subject in that light. Remember to move around the subject and try different angles.


Here’s a self portrait of me sitting in the dining room (in the light pictured above.) Yes, there was a couch in my dining room. Look at that nice, even light.


I can’t say this enough…. remember that not all good light is great light. In this example above, Ava was sitting on our bed, and we had several windows in the room. The image on the left is nice, but I moved slightly to the right for a different angle. The light looks much better in the photo on the right. See what I mean? I changed the angle just a few inches. That move made a big difference in the quality of light for this picture.


You can also use reflectors to add even more light to your subject when shooting indoors. You’ll want to do this especially when there isn’t much light and you need a little more light to light up the eyes or fill in dark details of the subject. This usually is the case when not much light is coming in a window. You can use inexpensive white poster board or foam core, wear a white shirt, even use natural reflectors like white or light colored walls. You can also buy small portable folding reflectors (they come in gold/silver.)

When using reflectors you’ll always want to position it so that the light bounces back the main light. In the example above, the window to the left is the main light and the reflector is bouncing that light back to Ava’s left side of her body. Since she wasn’t directly facing the window, I wanted to “fill in” the left side of her face with more light. This was not the only window in this part of the house – the right side of the couch had a couple of windows about ten feet away. So you don’t always have to have the subject face the main window, if you have enough natural light coming in from different directions.


Can you see that little bit of warm glow on Ava’s ear in the right of the photo? That’s that warm golden tone coming from the light bouncing back from that gold reflector. Now we have beautiful, even natural light in an indoor setting!

I’ve said it before and I’ll say it again – look at your subject from different angles. Look for the best light. It doesn’t matter if you’re shooting in full sun, dappled shade, even shade, sunrise/sunset, cloudy or inside with window light. You must do this in each situation and at each new location. Try shooting different angles until you get that light that makes your subject glow.

Wednesday, February 10, 2016

Shooting with Natural Light - Cloudy Days

Soft, naturally diffused light is what you get on cloudy, overcast days. And while you can't shoot sunflare or get that dreamy glow of backlight - there's all kinds of gorgeous light to work with. Shooting with natural light is often easier to do on cloudy days - lots of photographers get excited about dreary days because it means you can run around and take pictures wherever you want. Shooting in the middle of the day in an open field? Yep, totally can do that.

Perfect light no matter what?


Wrong.


Just because the clouds act as a giant diffuser, and you have this great light, does not mean all cloudy light is perfect. You still have to look for the best light. So what's my best tip to find the best quality natural light? Shoot from different angles until you find the sweet spot. You can also hold your hand up in front of you, and look at your palm. Turn around, watching your palm, and don't stop until you see your palm light up or have this glowing quality to it. When you see it, you'll be looking at really nice light. That's the place to put your subject. These two techniques are easy ways to find the best light.


In this example, I stood at the same spot. B took pictures of me from four different angles. As you can see, one angle is the best light. This is the light you’ll want to always look for. You can use the palm trick that I mentioned above, or you can just try a few quick shots of your subject from different angles until you find the best light. Even the slightest change in direction can take you from pretty light to fantastic light. If you’re shooting someone’s portraits, just tell them that you are taking a few practice shots to find the best light. Then let them know when you’re ready to rock and roll.

This activity of finding the best light before setting up a shot is key. You must do this with every new location, if you change position at the same location, or if the light suddenly changes. 


Here are some examples of images taken on cloudy days. Remember, just because it’s cloudy does not mean you can shoot wherever you feel like it. You must always look for the best natural light – no matter what the light conditions are.


In this photo the couple is facing the sun. Anytime you’re shooting on a cloudy day and it’s getting close to sunset, you’ll find that the available light you have to shoot with dwindles very fast. That’s because the sun is already on its way down so it’s a weak light, and to top it off it’s being diffused by clouds. So keep this in mind when you decide to start shooting on a cloudy day, close to sunset.


Because cloudy days have a natural diffuser, you can get gorgeous shots anytime of day. See all the details and colors in Bella’s fur? The concrete in the alley acts as a natural reflector and bounces more light back up. This photo was taken mid-day, but since it was a cloudy day we had a lots of opportunities to shoot in a wide variety of areas, areas that we normally would not be able to shoot in during typical mid-day full sun.

So that’s it for shooting with natural light on cloudy days! It’s really a fun time to take pictures - you have a lot more freedom when it comes to locations, but remember to always look for the best light.

Wednesday, February 3, 2016

Shooting with Natural Light - Sunrise and Sunset


The prettiest, most flattering and soft light happens when the sun is closest to the horizon at sunrise or sunset. When shooting portraits, I liked to start shooting the last 2 hours before sunset. For the first hour the sun would be too harsh to face directly. During that hour I searched out even light, dappled shade, or used backlighting. Once the sun touched the horizon, we'd hit the magic hour or the golden hour which lasts about 30-45 minutes (or less) depending on weather conditions. This is the best time to shoot portraits in a natural setting using only natural light.


1. What to do if the sun is too harsh If you find that the sun is too bright to face directly, you have 3 choices when shooting with natural light: find even light, dappled shade, or use backlight. Backlight is an excellent choice when you want to shoot in nature but the sun is too harsh at the time. Backlight will only work if the sun is low enough in the sky to be behind the subject. To capture soft backlight, expose for the subject. To capture a silhouette, expose for the background, then focus on the subject. These techniques can only be achieved if you are shooting in manual.


Examples of backlight, where the sun is behind the subject, and you expose for the subject.


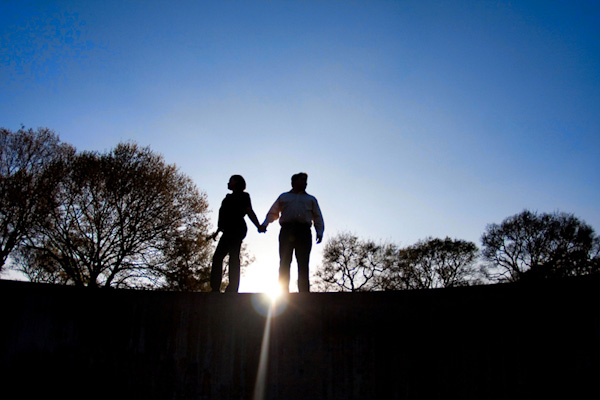
Examples of silhouettes, where the sun is behind the subject, and you expose for the background. Hint: take the meter reading off the sky.


2. The Magic Hour - AKA Sunrise and Sunset When you're shooting at sunrise or sunset, the magic hour is that brief window of time where the light is perfect everywhere you look. It's like the entire scene is one giant diffuser that makes every little detail shine. You'll notice different hues of color in water, the many shades of blades of grass, etc. This is simply magical light.

The only caveat is this light passes very quickly. It should also be noted that cameras with higher ISO capability and fast glass (lenses with wide open apertures) are pretty much necessary to shoot with natural light during this time without a tripod. Yes, it's a soft magic light but it's also a very weak light. The following three images are all examples of that moment when we had just enough light to face the sun, and you can see how perfect and even the light is in a natural setting.


The best quality natural light makes a huge difference with your photography. If you'd like to shoot portraits, try shooting during the magic hour. If you start shooting sooner than that - remember to seek out even light, dappled shade and use backlighting techniques until the sun reaches that magic hour.

Wednesday, January 27, 2016

Shooting with Natural Light - Dappled Shade


I've briefly introduced you to the different kinds of light and taught more about shooting in harsh full sun. For this post we're focusing on dappled shade. Other names for this kind of light include partial shade, half shade, medium shade, semi-shade... whatever you choose to call it, this is the kind of shade that has bits of light peeking through.


Let's say you're shooting portraits outside in a natural setting in a less than ideal timeframe. What can you do? Look for dappled shade. It's not the best option for portraits but it's still better than full sun. You can find dappled shade anywhere where there are trees or trellis - anything that creates some shade but also lets light through. If you're lucky there will be a really thick tree with lots of leaves that you can place your subject under. This can get pretty close to even light cast from buildings and solid objects. If the sun is lower in the sky but still too harsh, you can use dappled shade temporarily.


Shooting portraits in dappled shade isn't ideal, but it can work. Remember it always depends on what you're shooting, what you need, what you have to work with and what you want for the shot! The time frame for perfect light is so short, so I've almost always shot in a combination of dappled shade, even shade, sunrise/sunset, etc. This helped me get a lot of different shots during a session. In the example below, the sun was still very strong for certain locations so we found some shade to work with. Notice the bits of dappled light that are peeking through.


In the example above, we found a really thick patch of shade, but you can still see a tiny bit of dappled light coming through. Mostly it's on his shirt and on her legs. This is still pretty good light.


If you move in even closer in this location, you can utilize the light without getting the dappled light on your subject. The light peeking through now becomes a bit of bokeh behind the subject. And just look at that gorgeous, natural light!

The next time you're out shooting in a natural setting, look for dappled shade. Dappled shade can be helpful and provide fantastic light, especially when the sun is still a bit too harsh to shoot directly in.

Wednesday, January 20, 2016

Shooting with Natural Light - Full Sun

In this post we're learning all about full sun. Full sun is the most harsh (and evil) in the middle of the day. AKA when the sun is at the highest point in the sky. It's that time of day that the shade from your beach umbrella gets really tiny. When I sunburn in record time. During Texas summers, most local photographers tend to avoid full sun like the plague. It's just too crazy hot.


The biggest issue with full sun is that it is not flattering at all for portraits. Take a look at the example above - I'm a hot mess of light and shadow. My nose is super bright and there's a big shadow on my chest cast from my head. This kind of lighting for portraits is all kinds of bad.


Even so, we're often out and about during full sun - especially when we travel. So the light in the above photo isn't perfect and yes, we're wearing our sunglasses. You still want to capture these moments! Don't fret when you're on vacation and you want to shoot stuff and it's full sun.

However - do you want to take portraits?

My biggest tip is to not shoot someone's portraits during full sun if you want to utilize natural light. That being said: photographers can shoot great portraits in full sun, but they have to use things like reflectors, diffusers, and multiple external flash set-ups. I really hate using such things so I almost never use these techniques. Even so, here are a couple examples of how you can manipulate full sun lighting.


A reflector is used to reflect light back on a subject andto help fill in shadows. In this photo, note how the reflector helps brighten my face and remove some of the shadows, but not all the shadows are removed.


Diffusers diffuse the light falling on the subject, making it more even. The diffuser must be placed in the direction the light source is coming from (in this example, the sun is above me.) The diffuser provides a softer, more even light and the shadows are mostly eliminated.


In this photo, the lighting was far from mid-day sun, but the sun was still pretty high up there when we started this late afternoon shoot. We decided to have a little fun getting some shadows and playing with sunglasses. If you're shooting portraits, don't make all the photos like this, but there's nothing wrong with getting creative with harsh light for a series of pics.

So what's my best tip for shooting portraits when the sun is harsh? Look for even shade. Even shade is any shade that is cast by a solid object - this could be a building, carport, umbrella, etc.


In this photo you can see the location Brandon is shooting - the even shade is being cast by the building. Note that this is late afternoon, because the sun is quite low and behind the building. The sun at this time is still too harsh - so we looked for even shade.


And here are the beautiful results - gorgeous light!


If you seek out even shade when the sun is really harsh, you'll get rich colors, flattering skin-tones, and just gorgeous light. This light isn't guaranteed to be perfect, you'll still have to look for the best light in even shade locations, but once you find it, it's fantastic.


So the next time you go out to take pictures try to shoot in full sun, then try shooting in even shade. You'll get the most out of this post if you can take pictures of family and friends, pets or even product detail shots. The best quality natural light makes a huge impact for all types of photography, but when you're learning you'll notice the biggest difference with those subjects.

Friday, September 4, 2015

The Different Kinds of Natural Light


So here's the thing - there's great light, so-so light and bad light. I'm 99% sure most everyone has experienced the different types even without realizing it! No matter what you take pictures of - people, nature, pets, things, etc., the quality of light makes a huge difference in the pictures you take. Learning to shoot with natural light is key to great photos! So let's get started shall we?

The first thing to learn is the 6 different kinds of natural light...

  • full sun (mid-day sun)

  • even shade

  • dappled shade

  • overcast (cloudy days)

  • sunrise / sunset

  • backlighting


This harsh natural light is the most powerful during mid-day. That's the time when the sun is at the highest point in the sky. Even when it's not mid-day and the sun has come down some (or hasn't risen all the way up) this light is still really harsh. Full sun casts shadows on people and creates a very unflattering look for skin. It can be difficult to capture details of subjects. It's not an ideal light to shoot in... and people really hate squinting in it.


When the sun is too harsh and you can't look at it, the best light to look for is even shade. Even shade is light cast from buildings, walls, carports etc. During mid-day sun, the only even shade can be found under things like porches, carports, umbrellas, etc. That's because there isn't anything else that casts a decent sized shadow at that time. If you've spent the day at the beach and realized that your little umbrella shade was suddenly gone, that would be mid-day sun at it's best.


Shade cast from items like trees and trellis is what we call dappled shade. It's where leaves let bits of light shine through. This is not the best shade to work with so always look for even shade if at all possible. Sometimes a tree is so thick it will cast even shade (that would be your best bet if you have no other choice.) Ideally if you want to take portraits at a park with trees and have nice even light - you'll have to shoot when the sun is very low to the horizon closer to sunrise or sunset. The lower the sun gets to the horizon, the less shadows will be cast and the more soft and even the light will be.


Soft, naturally diffused light is what you get on cloudy, overcast days. The clouds act as a giant diffuser and you have this great light that is softer and more flattering. If you have a cloudy day, you can shoot portraits anytime, even in the middle of the day. The light is typically not as strong so you may find the need to face the sun to get the right light. Photographers get excited about cloudy days because we can shoot with reckless abandon! More or less anyway - unless of course you want to capture blue skies and sun flare.


Also called the magic hour or the golden hour this light is created when the sun is closest to the horizon, about 1 hour after sunrise and the last 1 hour before sunset. The best light would be about 45-30 minutes before the sun actually sets and the short 10 minutes you have after it passes the horizon. Just before you start to run out of light you will be able to face the direction of the sun. This light is a nice golden light and you won't squint looking at it. The magic hour is the best time to shoot portraits in a natural setting (like a park) to avoid shadows.


When the sun is still too harsh another option is to use backlight. Backlight can only be done when the sun is low enough in the sky to be behind the subject. If you turned around to face the sun it would still be too harsh and you'd squint. So instead place the sun behind your subject. Get in close, expose for the subject, then recompose and take the shot! Practice playing with backlight to see the dreamy quality light you can get from it.


So now that you're more familiar with the different kinds of light, let's take a look at some examples so you can see them in action. In this picture above, even though the sun is starting to set, the light at the red brick wall is still too harsh. But look around and you see there is even shade cast from the buildings.


In this example my friend is standing in harsh bright light... notice the strong shadows cast by the light. This is fun for some pictures (if you want a shadow picture) but forget asking your subject to look at you and smile. Just to the left however, is this great, fantastic light! Look for that nice, even shade cast from the building opposite this one. That's great light.

The next time you're out and about shooting, try to be aware of the different kinds of light. Practice shooting in the different kinds of light, look for even shade, catch the magic hour and have fun!

Tuesday, February 24, 2015

Different Types of Lenses

If you're just starting out with a DSLR camera, you probably have a standard kit lens which is just fine. For those of you with a fancy point and shoot camera, you might have a fixed lens. Even so, getting a better idea of the different types of lenses available and how they work will help you decide what lens you might like to get next or if you'd like to upgrade to a camera with interchangeable lenses in the future.

So let's check out the usual suspects and how to use them!


1. Zoom Lens
The zoom lens is what most kit lenses are. This is your out and about everyday lens to capture real life. It's a great multipurpose lens for documenting birthdays, holidays, family, friends, vacations. You can zoom in close or pan out for a wider angle view. Many zoom lenses even have a macro feature. Even though it's not a true macro you can still take nice up-close pics of flowers and butterflies, etc. My zoom lens is a Canon 24-70 2.8 "L" lens. I love 24-70 mm. A 70-200 lens is really great too. I used to have one but sold it because I didn't use it enough. Of course, I often wish I had the 70-200 lens.


2. Prime Lens
Prime lenses have only one focal length. In other words, there is no zoom. If you want to get closer to your subject, you walk closer. If you need to fit the entire wedding party in the shot, you'll need to get back (or switch lenses.) Having to rely on your feet to zoom makes prime lenses more active lenses. You'll find you have to be more aware / creative and really work the subject to get the composition you want. Primes also have the benefit of being lighter, usually producing better quality photos and are often more affordable. They are great for shooting details, product shots and portraits.

That being said, I really love my 50mm 1.2 prime. Now that's professional quality glass... an aperture of f/1.8 or f/1.4 in a 50 mm prime is great too. We actually own a 50mm 1.8 as well. Most of the time I shoot with my 50mm lens. I'd love to get a 35mm prime. If it were up to me, I'd have nothing but primes... but I do love zooms too. Oh, I want them all.


3. Wide Angle Lens
Wide angle lenses are often used to get the big picture or to evoke strong emotion in a setting. They are great for when you want to tell a story. The thing to remember is the wider the angle the more distortion you'll get. In this example there's a rock in the foreground (by the bush) and it looks like it could cover a pair of patio chairs but it really wasn't that big in real life. This is the distortion.

The closer you are to the subject, the more distortion you'll experience when using a wide angle lens. Of course it always depends on what you want when you take the shot and I still love this photo of the vintage Belmont Hotel in Dallas.  35 mm, 28 mm, 24 - 15 mm (ultra wide angle) are considered wide angle focal lengths.


4. Fisheye Lens
Fisheye lenses are actually ultra wide angle lenses that bend the horizon and convey wide open spaces. It creates a fun distortion. A true fisheye lens is for full frame cameras and the curve will be pretty close to 180 degrees. I had a fisheye lens that worked only on crop body cameras and it did not create a complete fisheye. However in this example you can see somewhat of a curve. Fisheyes can be used for portraits if you want to do something crazy and are best for when you want to be extra creative and bend the horizon or other lines.


5. Telephoto Lens
Telephoto lenses bring you really close to the action and take you to places you can't reach, like in the middle of a flock of flamingos. They are great for trips to the zoo, sporting events, graduations, bird watching and any situation where you want to get close from afar. Telephoto lenses have even more shallow depth of field so they blur the background more and make subjects really stand out. They come in either prime or zooms (the 70-200 is considered a telephoto zoom.) I often used my 200 prime for portraits, especially if I really needed to blur the background. Of course when I retired from shooting professionally I sold my 200 prime telephoto lens. Again, I kinda wish I still had it. I'd like to have every lens.


6. Macro Lens
Macro lenses offer endless creativity and subject possibilities because when you start to look at things up close, you suddenly have the coolest stuff to photograph! Take this macro image of a rose, taken my husband B. I just love that the rose fills the frame. If you ever find yourself thinking you have nothing to shoot, try shooting in macro. Because of the macro function these lenses have very shallow depth of field, even at small apertures like f/16. So if you are shooting wedding rings and you want all the rings in sharp detail, you'll need to use a small aperture like f/22 and probably a tripod.

If I had to pick my favorite types of lenses for sure I would include a prime, macro and wide angle. I also really enjoy the multipurpose function of a good zoom lens.