It's funny. I used to shoot with this big fancy camera in yearbook, an Olympus film camera. I loved that camera so much I got one just like it for graduation. It was the bee's knees! Then digital started coming out (remember the ones with the floppy disks?) My cameras just got smaller and smaller. Then I decided I wanted to shoot weddings: and I needed another big fancy camera.
But not just any camera, a DSLR. Oooooohhhh. Aaaahhhhhch.
There's really no point to my story btw. Just that buying your first big camera is an overwhelming choice. So many questions. What brand? How much? What's best for me? Since I got a ton of emails from people asking for tips on this sort of thing, I thought I should just make a big fat post about it already.
Thinking of buying your first camera (or ready to upgrade?)
Ask yourself:
1) what is your budget
2) what do you want to shoot?
3) do you want video capability or just stills?
Answering these three simple questions makes it sooooo much easier to think of what gear might be right for you. If you want creative control but don't love the idea of lugging around a big DSLR - then a fancier point and shoot (like the Panasonic Lumix, below) may float your boat. If you plan on shooting the kiddo's soccer games or marching band events... well then you probably want some type of telephoto lens. Want to shoot portraits? A 50mm prime is a great choice. Want to make videos too? Be sure to pick a camera that has video capability. Yep, you've got a lot of options. Here are just a few examples of what you can get for different budgets.

At some point I'm going to get a camera like the Lumix DMC-LX3. It will be for those times I don't feel like lugging around my 5DMii but want something better than my iPhone4s (though I LOVE my iPhone!) What I love about this camera is the 24mm f/2 Leica lens, full manual capability and you can shoot in RAW too. It's perfect for anyone who wants full creative control and flexibility in low light situations but doesn't want a full fledged DSLR or extra lenses. A brand new Lumix runs about 400.00 - but now you can snag a used one for about 150.00 That's probably what I'll do, because then I can just by more lenses for my DSLR! Just one thing: fancier point and shoots don't have the best ISO capability which means photos can be grainy (especially in low light.)
Lumix DMC-LX3 - used 150.00
other choices:
Lumix DMC-LX7 - new 500.00
also records HD video
Canon Powershot G15 - new 500.00
also records HD video
Nikon Coolpix P7100 - new 500.00
also records HD video
Now this little combo is pretty stinking affordable for a DSLR. What's the secret? Used gear! There's absolutely nothing wrong with buying used gear, just make sure you're buying from a reputable source. You'll still need to pick up filters and memory cards, but most used cameras come with a battery and charger. If you're buying a used lens (especially any you find on eBay) be sure to clarify that it is for a DSLR and not a film camera. Used gear is a GREAT way to get into digital photography, while saving some cash!
Canon Rebel XSi - used 250.00
Canon 50mm f/1.8 - used 90.00
Hoya 52mm filter - new 13.00
SanDisk Extreme 4GB cards - new 12.00 each
Nikon version:
Nikon D200 - used 250.00
Nikon Nikkor 50mm f/1.8 - new 125.00
Hoya 52mm filter - new 13.00
This is the exact same combo as the used option (above) but with a pretty bag to boot! I wish I had known I could get cute bags like this from the get go. But the guy at the Camera store (or was it just B&H?) prompted that the Canon bag was the one to get. As it turned out, I really hated that bag and never really used it.
Sold it at our garage sale for $5 bucks. heh. For about $20 bucks more (give or take) I could have upgraded to something snazzy instead. ;)
Canon Rebel XSi - used 250.00
Canon 50mm f/1.8 - used 90.00
Hoya 52mm filter - new 13.00
SanDisk Extreme 4GB cards - new 12.00 each
JoTotes camera bag - Rose in Marigold - 89.00
Nikon version:
Nikon D200 - used 250.00
Nikon Nikkor 50mm f/1.8 - new 125.00
Hoya 52mm filter - new 13.00
This combo is the typical camera body + kit lens. It's what you'll usually find at most retail stores like Best Buy (can't remember if you can get just camera bodies there.) Sam's and Costco also have pretty good deals and you'll usually get a standard bag + an extra lens in their kits. The lenses that come in kits are what we call "kit lenses." These type of lenses are more affordable because of their cheaper build quality and limitation of aperture. Kit lenses have an aperture range like f/3.5-f/5.6 - basically this means that certain apertures only work at certain focal lengths.
I started out with a camera body + kit lens. For me, it was the Canon 40D and whatever standard zoom lens. When I bought my camera I didn't realize it was best to just buy the camera body (or that I even had the option!) so basically I never used that lens. I lovingly refer to it as the paper weight. Not that it's a bad lens, I just never used it because I also bought my expensive L lenses (remember, wanted to shoot weddings?) and figured out real quick the limitations to the kit lens.
Canon Rebel T3 + 18-55mm IS II Lens Kit - new, 550.00
also records HD video
Hoya 58mm filter - 13.00
SanDisk Extreme 4GB cards - new 12.00 each
Jo Totes camera bag - Betsy in Teal, 109.00
Nikon version:
Nikon D3100 + 18-55mm Nikkor VR Lens Kit - new 650.00
also records HD video
Personally I think buying the camera body and lens separately is the way to go.
You can actually spend about the same amount as a kit, if you purchase a more affordable prime lens like a 50mm f/1.8. I love prime lenses, and shoot with my 50mm most of the time. However, sometimes I'm in places where the 50mm is just not wide enough. That's where my 24-70 zoom comes in. So if you can afford to spend a little more, then I suggest getting a lens like the Tamron. This combination is actually a used camera body and a new Tamron lens. Oh and look, there's the ho-hum Canon bag! ;) just kidding.
It's all about what. you. want.
Canon Rebel XSi - used 300.00
Tamron 28-75mm f/2.8 for Canon - new 500.00
Hoya 67 mm filter - 16.00
SanDisk Extreme 4GB cards - new 12.00 each
Canon 100DG camera bag - new 69.00
Nikon version:
Nikon D200 - used 250.00
Tamron 28-75mm f/2.8 for Nikon - new 500.00
Hoya 67mm filter - 16.00
Nikon bag (value pack) - 70.00
Now with this combination you get a brand new camera. Instead of buying a more expensive zoom lens, you can get two prime lenses and a new body for about the same price. Oh and a pretty bag too! Anyway, this is a great combo for being creative. The 50mm prime is great for details, candids, portraits and the 35mm is great for everyday activities and travel. Plus, you get that wide open aperture... great for low light situations and that dreamy background blur!
Get this for less by selecting a used camera (or lenses too!)
Canon Rebel T3 - new 330.00
also records HD video
Canon 35mm prime f/2.0 - new 320.00
Canon 50mm prime f/1.8 - new 125.00
Hoya 52mm filter - 12.00
SanDisk Extreme 4GB cards - new 12.00 each
Jo Totes camera bag - Millie in Sugarplum, 87.00
Nikon version:
Nikon D3100 - used 320.00
also records HD video
Nikon Nikkor 35mm f/1.8 - new 200.00
Nikon Nikkor 50mm f/1.8 - new 125.00
Hoya 52mm filter - new 13.00
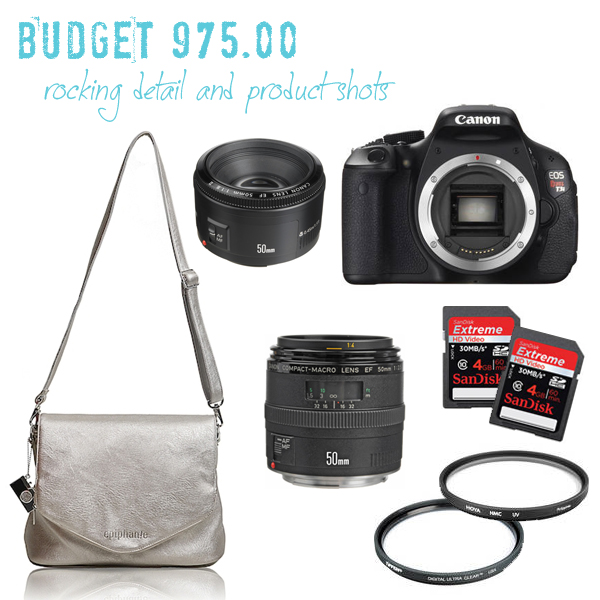
One of my FAVORITE things to shoot is details. Ring shots, flowers, products, all that fun stuff. This combination is great for food bloggers, Etsy peeps and anyone who wants to photograph details. The 50mm prime is awesome for overall detail shots (like capturing a whole floral arrangement) as well as portraits and it's a great walk about lens. The 50mm macro lens really shines for those super up-close details the 50mm prime just. can't. focus. on. A true macro lens is a must for ring shots, super close food detail, etc. Again - you can get this combination for less by choosing used gear. When I'm not shooting true macro, I prefer to use my 50mm prime because my macro is slower to "hunt" for focus. However some people use their 50mm macro all the time (for portraits too.)
It's all about what works for you.
Canon Rebel T3 - new 330.00
also records HD video
Canon 50mm f/1.8 prime - new 125.00
Canon 50mm f/2.5 macro - new 269.00
Hoya 52mm filters - 13.00 each
SanDisk Extreme 4GB cards - 12.00 each
Epiphanie camera bag - Charlotte in metallic, 155.00
Nikon version:
Nikon D3100 - used 320.00
also records HD video
Nikon Nikkor 50mm f/1.8 prime - new 125.00
Sigma 50mm f/2.8 macro for Nikon - new 369.00
Hoya 52mm filter - 13.00
Hoya 55mm filter - 18.00
If you want to really rock your camera, this is an awesome combo. The zoom lens comes in handy for days at the zoo, baseball games and thanks to that f/2.8 aperture... dance recitals (where you can't use flash!) But sometimes, f/2.8 just doesn't let in enough light - so in even lower light situations, you've got that 50mm prime. This is pretty much my favorite lens combo at the moment. Lots of creative options and low light flexibility. Remember, if you really want a lens combination like this... you can make it more affordable by purchasing used gear!
Canon Rebel T3 - new, 330.00
also records HD video
Canon 50mm f/1.8 prime - new 125.00
Tamron 28-75mm f/2.8 for Canon - new 500.00
Hoya 52mm filter - 12.00
Hoya 67 mm filter - 16.00
SanDisk Extreme 4GB cards - 12.00 each
Jo Totes camera bag - Allison in black, 89.00
Nikon version:
Nikon D3100 - used 320.00
also records HD video
Tamron 28-75mm f/2.8 for Nikon - new 500.00
Nikon Nikkor 50mm f/1.8 - new 125.00
Hoya 67mm filter - 16.00
Hoya 52mm filter - new 13.00
For budding paparazzi, there's even bigger zooms. I actually started out with a 24-70 zoom + a 70-200 zoom, but I really didn't like my 70-200. Of course, as soon as I sold it and B started shooting, he wished I had it! Basically I was hardly in the situation where I needed the extra zoom... in many places it flat out didn't work because I was too close to start with. But for some people, getting that close is awesome. I just didn't use it enough to justify the cost (I had the Canon 70-22mm f/2.8 IS lens.) A zoom like the 70-200 is great for sports where you're far away, the zoo and anytime you want to be stealthy at weddings ;)
Canon Rebel T3i - new 600.00
also records HD video
Tamron 28-75mm f/2.8 for Canon - new 500.00
Tamron 70-200mm f/2.8 for Canon - new 769.00
Hoya 67 mm filter - 16.00
Hoya 77mm filter - 30.00
Jo Totes camera bag - Gracie in mint, 119.00
Nikon
Nikon D5100 - new 700.00
also records HD video
Tamron 28-75mm f/2.8 for Nikon - new 500.00
Tamron 70-200mm f/2.8 for Nikon - new 769.00
Hoya 67mm filter - 16.00
Hoya 77mm filter - 30.00
When I decided to shoot weddings, I bought some pretty expensive gear right away. Kinda extreme considering I'd never even used a DSLR before! Yep, I was clueless but lucky for me I had some tips from a new wedding photographer in Utah.
Opie was kind enough to recommend lenses and how to get a portfolio started. She also clued me in to this thing called batch editing. ;) So I bought two lenses she shot with, but ended up getting Canon L glass (the most expensive) and she actually used Sigmas at the time.
Apparently I was a little confused. Ha. Oh well, I do love my lenses! Basically what I'm trying to say is: the Sigma versions are GREAT lenses and are a smart choice if you can't afford the most expensive glass right away.
Sigmas are more expensive than the Tamrons (which I used in most of the options above) but almost half the price of the Canon L glass. So while Opie shoots with L glass now, she started out with Sigmas and those photos were just gorgeous. My favorite macro that I used regularly for wedding ring shots is the Sigma 50mm f/2.8 macro. Just goes to show that again, technical skill is the most important thing.
Sigma 50mm f/2.8 macro for Canon - new 369.00
Sigma 24-70mm f/2.8 for Canon - new 900.00
Sigma 70-200mm f/2.8 for Canon - new 1400.00
Sigma 50mm f/2.8 macro for Nikon - new 369.00
Sigma 24-70mm f/2.8 for Nikon - new 900.00
Sigma 70-200mm f/2.8 for Nikon - new 1400.00
Canon 50mm f/1.2 L - new 1600.00
Canon 24-70 f/2.8 L - new 2300.00
Canon 70-200 f/2.8L IS II - new 2500.00
Nikon 35mm f/1.4 - new 1600.00
Nikon 24-70 f/2.8 - new 1900.00
Nikon 70-200 f/2.8 - new 2400.00
A better camera body is awesome, but glass is more important. That being said
there are advantages to more expensive camera bodies. If you happen to have some extra $$ and want to upgrade (or let's say, you want to start shooting weddings or portraits) then by all means consider picking up an advanced camera body. Just FYI - knowing your stuff (shooting in manual, lighting) and shooting often is the
most important aspect of capturing great photos. The best gear will only get you so far if you don't master the technique.
So my first DSLR was the Canon 4oD. It had a higher ISO capability than the Rebels (I could easily shoot at 800 ISO without grain) and it was also more expensive. Now you can still get the 40D used or the newer 60D. If I was picking out my first camera (for shooting weddings) all over again, I'd probably splurge and get the new Canon 6D. It has great ISO capability *and* it's full frame! Or I would pick up a used 5D Mark ii.
Ah, decisions decisions. The Canon 7D is another great option for a mid-range semi-pro to pro camera.
You might be thinking, what's full frame? Here's the short answer: full frame = bigger sensor. bigger sensor = better photos. Less expensive, beginner camera bodies have a smaller "crop" sensor. That's why full frame cameras have richer and more true to life colors, better sharpness and ISO capability (less grain at high ISO.) Since crop body cameras have smaller sensors, there is also a "crop factor" when it comes to lenses. A 50mm lens will be more like an 80mm on a crop body, but will be the true 50mm focal length on a full frame. You can also get lenses that are made for crop bodies only. Nothing wrong with these lenses, but if you ever upgrade to a full frame body... you won't be able to use those lenses. Full frame cameras are AWESOME but they are also expensive!
After a couple of years of shooting with the 40Ds we upgraded to 5D Markii cameras. My mom upgraded from her Rebel to an original (used) 5D and saved a ton. It was perfect for her needs and she LOVES her camera (check out her
super cute cards!) Since then the 5D Mark iii has come out and though I would LOVE to have that camera, I don't really feel like the current 3500.00 price tag...
yet. ;) If I still shot weddings though, I would be allllll over that bad boy.
Canon advanced camera options:
Canon 40 D - used 400.00
Canon 60D - new 1000.00
also records HD video
Canon 7D - new 1500.00
also records HD video
Canon 5D* - used 800.00
Canon 6D* - new 2100.00
also records HD video
Canon 5D Mark ii* - used 1700.00,
new 2200.00
also records HD video
Canon 5D Mark iii* - new 3500.00
also records HD video
Nikon advanced camera options:
Nikon D90 - used 600.00
also records D video
Nikon D7000 - new 1200.00
also records HD video
Nikon D700* - used 1650.00
Nikon D600* - new 2100.00
also records HD video
Nikon D800* - new 3000.00
also records HD video
*full frame cameras
Holy moly... that was a lot of info! So there you have it, my tips for buying your first DSLR (or upgrading to something better.)