Sunday, April 1, 2012

Spring Cleaning - 8 Tips for Photography

Well, it's April and I'm all about getting the yard ready for outdoor time, spring cleaning and getting my photo gear in order too. Are you excited about the spring and summer season coming up? There will be lots of picture taking opportunities so get your cameras ready for spring with these 8 tips:


1. Get inspired
Make a list of things you'd love to photograph this season. Plan dates for photo excursions such as shooting tulips at the Arboretum or a photo day at the zoo. Try to get out there and shoot something for fun at least once a week (even if you only have 30 min. to spare.)

2.  Review your goals and skills
What skills have you learned? What can you do to improve those skills? What new skills would you like to learn? Pick two or three goals and create a game plan. You might want to sign up for a class, buy a new book or new gear... make a list and make it happen!

3.  Get squeaky clean
Call your local camera store or send the camera off to the service center (like Canon or Nikon) to have your camera professionally cleaned. There are kits to do sensor cleaning yourself if you have a steady hand (and a quiet, clean place to do it.) Personally I prefer to have it cleaned so I don't have to stress about messing up the sensor.


4.  Backup your pictures
This is so important! Make sure you have backups of your pictures.  I always have at least 3 backups. Don't forget the images on your phone too. There's nothing worse than losing beloved memories. Use external hard drives, additional computers, data DVDs, etc. Just backup those photos. If you have severe thunderstorms, make sure a copy of photos is not plugged in.  We've had lightning take out all electronics before, which is why we shut down and unplug during bad storms - even with our surge protectors.

5.  Clean up your computer
Delete pictures you no longer want, such as photos that didn't make "the cut" etc.  Clean up old folders, organize your pictures to make them easier to find (I organize by year/month/event)  If you have a PC you'll want to defrag your computer too. Mac users can zero out (erase) free space. Doing so will help your computers have more kick!


6. Clean your camera bags
My camera bags get stupid dirty. I've found twigs, leaves and dirt in mine (hey, I crawl around on the ground a lot.)  Bags not in use are also great places for me to dump random gear. Take a moment to clean out those bags, organize them and even give the insides a little vacuum to pick up any dirt, pet hair, etc. that might get in the bag. When photo inspiration hits, your bag will be good to go!

7.  Sell unused gear
I must admit, I'm really bad about this.  I still have my kit lens that I've never used. That being said, one of my goals this spring is to clear out some unused gear. Just like digging through your clothes closet,  take the time to go through and consider selling gear you don't really like or never use. Then take that extra cash and get something else you really want!

8.  Update inventory.
When I shot weddings, I used to keep a list of all of our photo equipment, for insurance purposes.  If you don't have an inventory list yet, consider starting one. If you do have one, make sure it is up-to-date. Make a list with the make, model and serial number of each piece of equipment then keep it in a safe place (make a few copies too!)  The list also includes important phone #'s. You'll be glad to have it in the rare event you might need it.

Monday, February 20, 2012

Shooting Details in Low Light With Basic Lamps and A Tripod

When taking pictures, I'm all about natural light. And for detail shots that nice big window light is the bee's knees. That's my ideal light, but sometimes I run out of time and find myself in the dreaded lamps only low-light situation. Bleh! Yes, I have multiple flashes and could go for an extensive setup but most of the time I'm just lazy. Why would I want to do that? So let's say you're like me and you spent the afternoon playing Sims (um, I mean working) or maybe you just get home after dark. If you're itching to take pictures of your new Etsy swag with only low-light, here's what you do:

Get a tripod.


Tripods come in all sizes and price points - just make sure to get one that is sturdy enough to hold your camera. Those big guns like my Canon 5D Mark II get really heavy. Using a tripod for product shots works wonders in both natural light and low-light detail situations, especially if you want to get lots of stuff in nice focus. But for this post, we're all about that low light situation, inside with just your average household lamps. This is for detail product photography only - not people.

Shooting portraits in this light would just be a hot mess. Trust me.


So here's my lazy person set up:

  • stuff to photograph (globes)

  • camera on tripod

  • two basic floor lamps (different lamps will produce different results, so just try it out)

  • white balance set to Tungsten light (I usually stick with AWB but not in this situation)
Just FYI this is at night, so I'm relying solely on ambient light from lights in the room. In the image above you can see some yucky shadows on the wall.  That's because in this shot the overhead light is on (ceiling fan.) When you're trying to do this, overhead lights like ceiling fans and chandeliers will NOT cut it. They cast too many shadows either on the wall or big shadows from your product.


So let's say you don't have a tripod. This is what happens when you have to use a slow shutter speed to let in more light. Anything handheld slower than 1/50th second is going to look bad.


The other option you have (if you don't have a tripod) is to use flash. Here's an example of the Canon 40D's standard pop up flash. See those big shadows and bright highlights on the globes? Meh.


Low light + details + camera + tripod = yay! In the photo above I only have one light on in the room - lamp #1 (on the right.)  It works nicely, but if you want to fill in a little more shadows / darkness  on the left of the globes... you could turn on lamp #2.


And here it is, a globe shot with both floor lamps turned on. These images have a little editing in Photoshop. There is so much more to work with when you shoot detail shots with a tripod. So the next time you want to take detail shots but it's already dark outside - get out your tripod. And remember, that tripod is great for anytime you're shooting product / detail photography - even when there's still window light to use.

Monday, February 6, 2012

Shooting Macro Photography - Take a Closer Look

One of the best things about digital photography is the ability to take as many pictures as you want to experiment and be creative. Shooting macro photography is just one awesome way to get really creative and it's so much fun.

When I used to shoot weddings, I used my macro lens to shoot ring shots and it's was always one of my favorite things to shoot. Lately I've been looking around the house to see what other stuff I can take pictures of. Once you start thinking on the macro scale of things, all kinds of photo opportunities appear! Note to self: take macro lens and find blue dumpster.

Don't have a macro lens? Some lenses have a "macro" setting and even though it won't get you super close like an actual macro lens, you can still try your hand at shooting in macro.  Just try shooting as close as possible and focus on the little details.  If you have a macro lens, even better!

You could take a picture of a vintage camera:


Or you could get real close:


You could photograph this pretty pretty globe:


Or you could get even closer and focus on where you live:


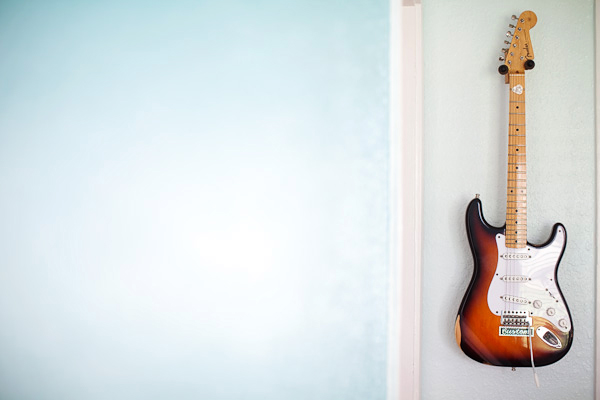
You could take a picture of a guitar... (guitars are cool, just sayin')


Or you could capture some up-close details (my rockstar husband approves.)


Next time you're out, take a closer look at the details around you... what kind of things would you shoot in macro?

Thursday, January 26, 2012

Best Memory Card Size for DSLR Cameras

Imagine your dream vacation: two weeks, exotic locales, amazing photo ops. Or maybe it's your first born: weekly belly photos, baby showers, the big day, little baby steps. It could be an entire year of events and milestones. These days you can easily take thousands of photos on big memory cards before filling them up. I mean, it's just so convenient right? Only one problem, imagine how you would feel if that one card suddenly failed. There's a chance you could recover some of the pictures, but still. And it does happen - just like it did to a friend of ours who had a dream anniversary vacation to Hawaii. Trust me, it's not a good feeling. So what can you do? Don't keep all your eggs in one basket - shoot with smaller memory cards!


I fell into this habit when I used to shoot weddings. It's bad enough if you lose your personal photos, but it's a whole other thing to lose someone else's memories that you're in charge of. Instead of shooting on the biggest memory card, I decided to shoot with several smaller cards. This way if something happened with one card, the whole day (6-8 hours of shooting) would not be lost. For weddings, we would each fill up a set of 10 - 4GB memory cards. We shot in RAW and since our camera's RAW files are crazy big, the images take up lots of space. That being said, you could still fit a high (risky) number of JPG images on that same 4GB card. So for JPG shooting I would recommend 2GB or smaller cards or you could deliberately switch out cards to keep from taking all pics on the same card.  We do that when we're shooting in JPG on our 5D Mark II cameras with the 4GB cards.

It should be noted that memory cards continue to get bigger and bigger since I first wrote this post. My advice is to shoot with the smallest cards you can buy, depending on the file sizes of your camera. 

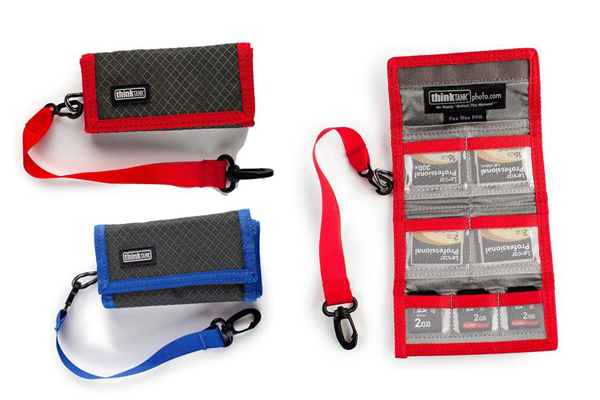
Of course, shooting with smaller memory cards means having more to keep up with (and lose!) To keep up with all our cards we use Think Tank's Pixel Pockets. I LOVE my Pixel Pocket except I don't trust that plastic strap to hang it on. No way Jose, that baby stays in my camera bag.

Pixel Pockets are awesome! There are 3 different sizes / kinds to choose from. My husband and I both have a blue 10 card Pixel Pocket. There's also a 6 card holder and then the Pixel Wee (the cute red one) holds 6 cards. The blue ones are actually designed to hold compact flash cards (out of their little plastic case.) Only the red Pixel Wee holds SD cards (and only 3 of them.)  However if you keep your SD cards in their plastic case, they fit in the compact flash spots perfectly.


Remember, digital cameras are amazing but don't shoot all your pictures on the same card! Shoot over several cards during vacation / big events and back up often when possible. If you are using just your iPhone then be sure to have it set up to back up to the cloud. You'll be glad you did!

Wednesday, January 18, 2012

Creative Photography Tips For Beginners

Digital photography is so much fun. I love that you can be creative, capture emotion and become completely absorbed in the little things. The more pictures you take, the more creative you become and if you look at things with your creative eye, there's something to photograph anywhere! And people wonder why I get excited about blue dumpsters.

One day I set out to find some great examples of seeing things creatively. We were driving through the city when I spotted this colorful brick wall. Sure, it had a some kind of tooth painted on it... and yeah I guess a sick puppy. But it had potential and that's all you need!

Here's the typical "take it as you see it" photo...


This photo is great, but why not get really creative? Start shooting from different angles, walk around, fill the frame, look for interesting colors and textures. Now that's seeing things with your creative eye. So you could take a picture like that... or like this:


And you could take a picture like this (yep that's a sick puppy) or you could do this...


So the next time you're out taking pictures, what will you see? Will you see a colorful wall? Or something more?

Monday, March 21, 2011

Seeing the Light

One day in our kitchen, we were talking about light.

"Look, pretend this is the sun." I pointed to the window while declaring the pepper mill the wall and the salt shaker my subject. "The light from the sun falls over the wall and bathes the subject in this gorgeous light... see?"

My mom nodded her head in a semi-understanding. I moved the little salt and pepper around and pointed out different angles. Brandon leaned up against the counter, nodding in agreement.

"But that's just when there is enough light spilling over. Everything changes after that... you'll see." Then I spun around on the little barstool and grinned. Because the only way to master natural light is to get out there and shoot with it. Getting fancy with the spices will only get you so far.

I'll admit in the beginning, I had a crazy time seeing the light. The books I read talked about the color of light, its temperature, the way light looked throughout the year, and how natural light changes at every given moment. I used to think that cloudy days were the best light and that everywhere you looked the light was perfect. Eventually I realized that even on a cloudy day you'll find ok, so-so and then amazing light.

So what does it take to find the light? Lots of practice and moving around your subject! If you find yourself frustrated shooting with natural light, keep shooting. I promise you'll eventually see the light.

Monday, August 30, 2010

Everyday Details

Have you ever wanted to take pictures of details: books, favorite things, meals, etc? This is especially important if you are a blogger and want to post the best photos you can take on your blog.

To achieve great detail shots you'll need:

1) Good light - the quality of light can make or break an image.
In my piggy bank photos, the subject is illuminated by a nice bright window (facing the window.) 

2) Shallow depth of field - using a wide open aperture will focus on the subject matter and leave the background nice and creamy.

3) Shutter speed - to achieve sharper detail images, I generally do not let my shutter speed drop below 1/80. Ideally I like to shoot at 1/100 or faster.

4) Post processing -  I try to keep post processing to a minimum.  However my favorites are a mix of Totally Rad Actions and Kubota Actions. The following images feature: Boutwell Magic Glasses 40%, Midbright 20% and Smarter Sharp.

Time for some photo examples, with my cute little piggy bank.


camera: 5D Mark II
lens: 50mm 1.2 L
settings: f/2.2, 1/100, 50mm, 1000 iso


The above image of Piggy was captured with my beloved 50mm 1.2 L glass lens. L glass is top of the line, professional quality and it's expensive. The good news is there are three different 50mm lenses to choose from. A 50 mm f/1.2 L, 50mm f/1.4 and 50 mm f/2.8 will allow you to have a wide open aperture and background blur. The quality of each lens will affect the end result.

Also, the more expensive the camera, the better the results. The examples below show how the lenses performed on a Canon 40D and a Canon 5D Mark II.


Here you might be able to see the difference in quality between the 50mm 1.8 and the 50mm 1.4.
Both images shot with Canon 40D, f/2.2, 1/100, 50mm, 1000 iso